MARGOT RIB BEANIE © Project Weekend Creative LTD. 2022
👉 QR links can break and pattern cards can go missing, so ensure seamless access to your pattern. COPY, PASTE & SAVE it to your device.
You can even print it out for some #offlineviewing enjoyment!
MARGOT RIB BEANIE PATTERN

Featuring larger than life stitches that literally pop in a 2x2 rib texture, this beanie is the envy of all who gaze upon it. Be prepared for all of your friends to ask you to knit them one!

NATURALLY SOFT, NOT CHEMICALLY SOFTENED
We created our Nehv yarn from a special selection of premium quality Merino fibers to create luxurious warmth, squishiness and stitch definition. Sustainably grown and 100% naturally soft, (not chemically softened), Nehv is grown in the beautiful highlands of Argentina and spun in a Fair Trade Certified facility in Peru.

PROJECT SKILL LEVEL : BEGINNER
Beginner Level projects are perfect for anyone who has completed a couple Learn-To-Knit projects before and is comfortable casting-on / binding off, and knitting knit and purl stitches. These projects may have simple increases and decreases and simple stitch repeats.
TIME TO MAKE
1-2 Hours
PATTERN SIZE
One size: Fits most Adults and Youth
PROJECT MEASUREMENTS
Finished Circumference (relaxed) : 15”
Finished Height (uncuffed): 13”
GAUGE
2x2 Rib, 12mm Needle:
10 stitches in 2x2 rib stitch x 9 rows = 4" x 4" square
MARGOT RIB BEANIE KIT CONTENTS

- 1 Ball of Project Weekend's NEHV. Each ball weighs 200 GR. (7oz) and has 99m (109y).
- 1 Pair of 12mm / US 17 Circular Knitting Needles
- 1 Card With Links To The Online Pattern & our Knitting Video Tutorials Library
- 1 Stitch Marker
- 1 Knitters' Sewing Needle
- 1 "PROJECT WEEKEND x ME." Woven Label
TECHNIQUE TUTORIAL VIDEOS & ILLUSTRATIONS
We've made learning easy! Easily reference our library of tutorial videos and step-by-step illustrations with just a click of your mouse. Look for tutorial links embedded throughout the pattern, and when in doubt, just click and learn!
A QUICK NOTE ABOUT GAUGE
Taking some time before starting a knit project to make a gauge swatch can make all the difference between project success and total complete frustration.
A gauge swatch will tell you if you are knitting too tight or too loose for the pattern you are creating. It helps make sure that what you are knitting will measure out and fit just right. If you are new to knitting, you can also think of the gauge swatch as a test run for learning your stitches before you start your main project.
Cast-on with the recommended gauge swatch stitch count and knit the number of rows indicated in the gauge section of the Project Details section above. Once finished, your swatch should measure out to 4” x 4”. If your swatch comes out too small, it means you are knitting too tightly, so loosen up your stitch tension a bit. If your swatch comes out larger than 4”x 4”, you are knitting too loosely, so tighten up your stitch. Once you have found your gauge, you can begin knitting your project!
Need more info on how to make a gauge swatch? Click our How to Create a Gauge Swatch
PROJECT NOTES
This project is knit in-the-round using a circular needle. Watch the video How to Use Circular Knitting Needles - Joining In-the-Round and How to Use Circular Knitting Needles - Magic Loop Method for a demonstration of these techniques.
How to Use Circular Needles - Joining In the Round
How to Use Circular Knitting Needles - Magic Loop Method
PATTERN ABBREVIATIONS
K2, P2: Knit 2 stitches and Purl 2 stitches. When repeated over multiples of 4 stitches, it creates a stitch pattern called the 2x2 rib.
K2Tog: Knit the next two stitches together at the same time (a decrease of 1 stitch)
P2Tog: Purl the next two stitches together at the same time (a decrease of 1 stitch)
PATTERN
THE MARGOT RIB BEANIE
1. With a yarn tail approximately 45" long, make a slipknot. This is considered your first stitch.
2. Cast-on another 35 stitches using the Longtail-Cast On Method. (total 36 stitches on your needle).
How To Cast-On Using The Longtail Cast-On Method.
4. Place a stitch marker on your right needle and join the work in the round, being careful not to twist any stitches.
5. Round 1: *K2, P2 repeat from * to the end of the round to create a 2x2 rib pattern, transfer the stitch marker from the left to the right needle.
6. Round 2 & onwards: Repeat round 1 until work measures 11” from the cast on edge, transferring the stitch marker from the left to the right needle at the end of each round.
7. SHAPING THE CROWN
Round 1: *K2, P2, K2, P2Tog repeat from * to the last 4 stitches, then K2, P2 (32 stitches remaining)
Round 2: *K2, P2Tog, K2, P1 repeat from * to the last 4 stitches, then K2, P2tog. Remove Stitch Marker (27 stitches remaining)
Round 3: K1, Place Stitch Marker, K1, K2Tog, K1, P1 then *K2, K2Tog, K1, P1 repeat from * to the last4 stitches, then K2, K2Tog (22 stitches remaining)
Round 4: *K3, K2Tog repeat from * to last 2 stitches, then K2 (18 stitches remaining)
Round 5: *K2Tog repeat from * until you reach stitch marker (9 stitches remaining)
Decreasing: How to K2tog (Knit 2 Together)
Decreasing: How to P2tog (Purl 2 Together)
TIP: Decreasing down to just a few stitches on your circular needle can make for some pretty tight stitches that are a challenge to knit. To help make knitting these last few rows easier, use the Magic Loop Method for the crown shaping. Watch our video Circular Needles - Magic Loop Method for a demonstration of this technique.
CLOSING UP THE CROWN
7. Remove the stitch marker and cut a yarn tail approximately 12” long and thread it onto the knitters sewing needle.
8. Follow the below instructions to close up the crown of the hat.

Beginning with the first stitch of the next row, weave the sewing needle through the first stitch, pulling the yarn through

Slip the stitch off the needle and onto your yarn tail.
Repeat these two processes until you have all the stitches transferred off the knitting needle and onto the yarn tail.
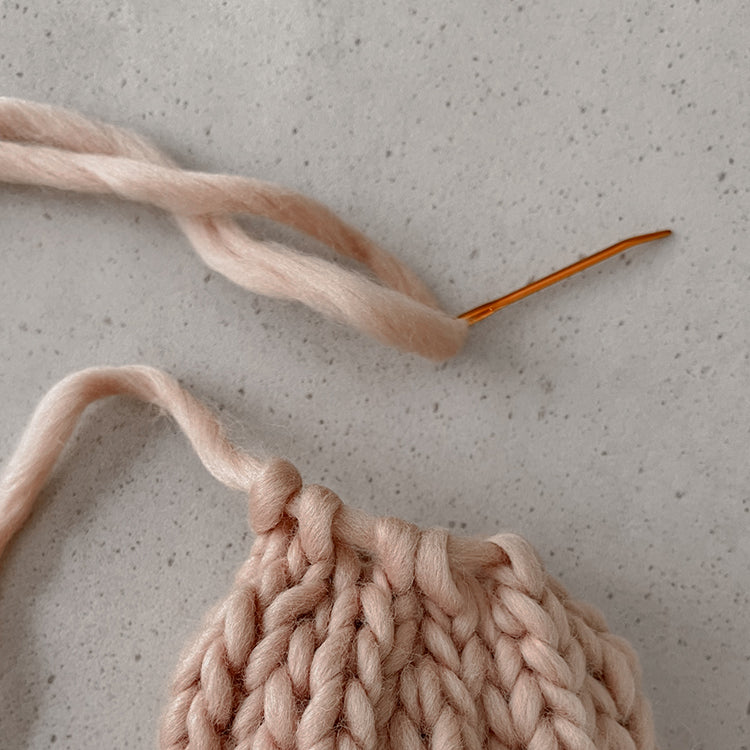
Image shows all stitches have been passed over onto the yarn tail and the knitting needle has been removed.

Pull the yarn tail so that the top of the hat stitches form a small hole.
Pass the needle through the crown hole to the inside of the hat and then turn the hat inside out.

Interior of hat: With the hat inside out, gently pull on the yarn tail to create as small of a hole as possible.

Interior of Hat: Weave the yarn tail through the loop stitches a few times.
This will secure the hole in place and will prevent it from opening up.
FINISHING
9. Weave in all loose ends, and proudly sew on your Project Weekend x's ME. label.


HOW TO SNUG UP A LOOSE FIT
For a variety of reasons, we may need to snug up the fit of our knit pieces. Sometimes our knit pieces will fit too big because we knit too loosely off gauge, or over time our hats or the cuffs on our sweaters and socks have stretched out and we want to bring them back to their original perfect fitting shape.
Sewing in a couple rows of elastic thread is a great way to keep our knitwear looking beautiful and fitting the way you want it to.
HOW TO SNUG UP THE FIT OF A 2X2 RIB KNIT HAT BY ADDING ELASTIC THREAD ROWS

Items Required: knit hat, sewing needle, elastic thread, scissors.

Thread the elastic thread through the needle, but do not cut any length, you will pull length as needed from the spool.

With the hat right-side out, unfold the cuff and lay the hat flat on a table with the hem facing away from you. You will begin by threading a row of elastic through the first row of stitches (the row just below the cast-on edge).

Identify the knit rib columns (it's the columns 'or mountains' of upside down V's).
Going from right to left, insert your needle through the "right side" leg of the 1st rib "V".

Pass the needle over top of the "left side" leg of that first V. Next, insert your needle through the "right side leg" of the next knit stitch.

Pass the needle over the "valley" of Purl stitches. Repeat threading through the next 2 columns of knit stitches (right side leg of the stitch only).

Continue knitting through the knit stitches "mountains" and passing over the purl "valleys" all the way around the first row of stitches.

Image shows elastic thread through first row of knit stitches (right side legs of V's only!)

Before you cut the yarn, check the elastic thread tension. Make sure it is threaded through the row with the same tension as the knit hat. You do not want it to be too tight or loose and wavy. You want it to be naturally relaxed. Adjust your stitches and the elastic as necessary.

Cut your yarn tail long enough to tie knots. Tie a very secure knot. Triple or Quadruple knot, just be safe! :)

Next, trim the yarn tails cleanly.

Threading Row 2: Repeat the above steps, this time 4 rows down from the first row.

Threading Row 3: Repeat the above steps again, this time 4 rows down from the 2nd row.

Image shows 3 rows of sewn in elastic thread.

Fold up the cuff. You will notice that the cuff snaps nicely back to shape after being stretched out. This creates a more snug fit and will help maintain the shape of the hat.

Because we insert the elastic thread on the inside of the cuff, you won't see it on the outside or the inside of your hat!
MAKE ANOTHER ONE!
SHOP THE YARNKNIT A NEW PROJECT!
SHOP KNITTING KITS