WANDERLUST WRIST WARMERS © Project Weekend Creative LTD. 2022
👉 QR links can break and pattern cards can go missing, so ensure seamless access to your pattern. COPY, PASTE & SAVE it to your device.
You can even print it out for some #offlineviewing enjoyment!
WANDERLUST WRIST WARMERS
Our Beginner series patterns are designed to guide you every step of the way and include detailed illustrations and how-to videos making it easy to get yarn onto your needles through to adding all the right finishing details to make your project look super-pro!

Knit your very own ultra-cozy rib knit wrist warmers that you won’t want to take off even when you’re indoors. Featuring a classic rib knit low profile silhouette, they add an ultra soft layer of warmth to your fall wardrobe.

NATURALLY SOFT, NOT CHEMICALLY SOFTENED
We created our LOLL yarn with a special blend of premium Merino and Baby Alpaca fibers to create soft-as-a-kitten warmth and squishiness. Sustainably grown and 100% naturally soft, (not chemically softened), LOLL is grown in the beautiful highlands of Argentina and Peru and spun in a Fair Trade Certified facility.
PROJECT SKILL LEVEL : BEGINNER
Beginner Level projects are perfect for anyone who has completed a couple Learn-To-Knit projects before and is comfortable casting-on / binding off, and knitting knit and purl stitches. These projects will have simple stitch repeats and will
TECHNIQUES YOU WILL LEARN
- Making a Gauge Swatch
- The Slip-Knot
- Casting-On Stitches (using the Longtail Cast-On Method)
- The Knit Stitch
- The Purl Stitch
- Binding Off
- Sewing Together A Seam
- Weaving In Loose Ends
TIME TO MAKE
2-4 Hours
PATTERN SIZE
Child, (Youth), Adult
PROJECT MEASUREMENTS
Finished Length:
Child: 6"
(Youth): 8"
Adult: 9"
GAUGE
2x1 Rib, 5 mm Needle:
20 stitches x 22 rows = 4" x 4" square
WANDERLUST WRIST WARMERS KIT CONTENTS
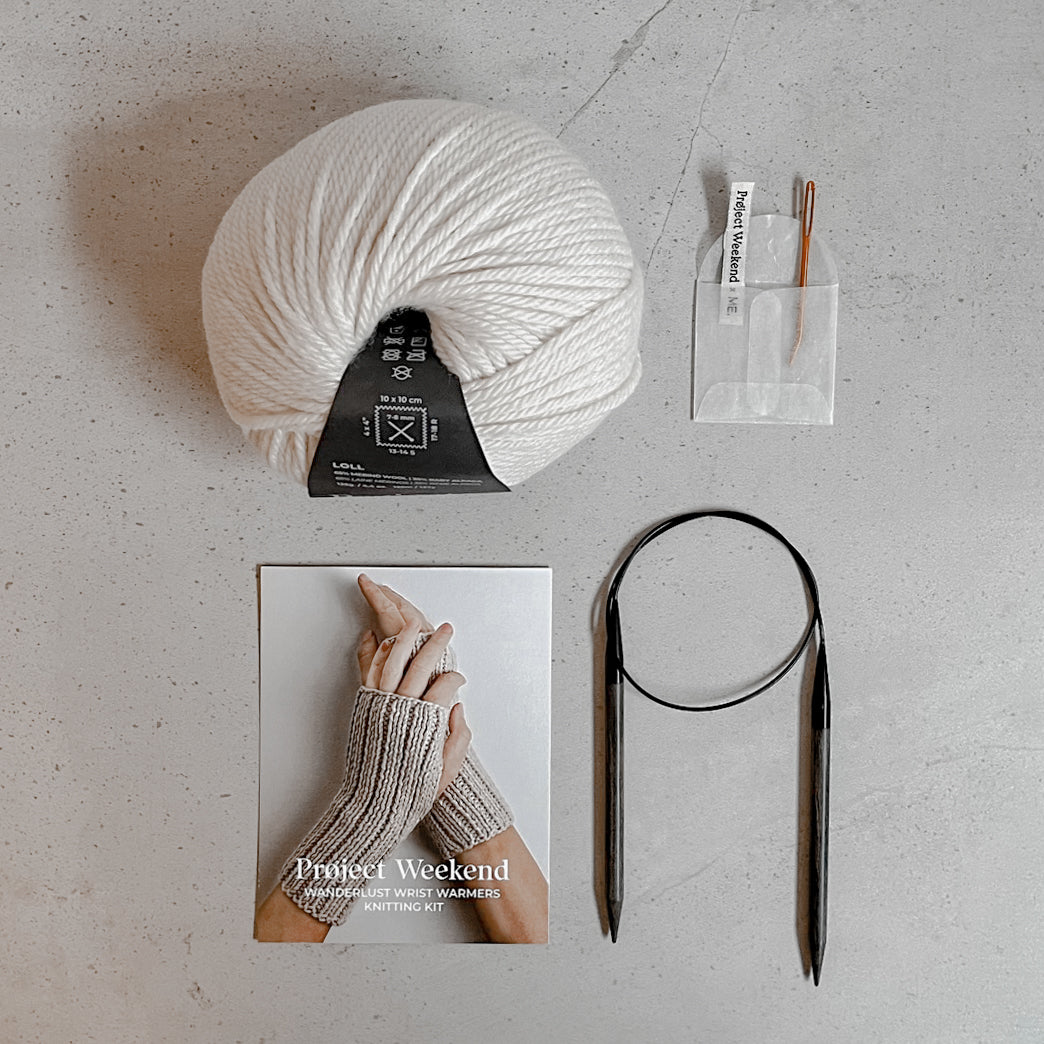
- 1 Ball of Project Weekend's LOLL. Each ball weighs 200 GR. (7oz) and has 99m (109y).
- 1 Pair of 5mm / US 17 Circular Knitting Needles
- 1 Card With Links To The Online Pattern & our Knitting Video Tutorials Library
- 1 Knitters' Sewing Needle
- 1 "PROJECT WEEKEND x ME." Woven Label
TECHNIQUE TUTORIAL VIDEOS & ILLUSTRATIONS
We've made learning easy! Easily reference our library of tutorial videos and step-by-step illustrations with just a click of your mouse. Look for tutorial links embedded throughout the pattern, and when in doubt, just click and learn!
A QUICK NOTE ABOUT GAUGE
Taking some time before starting a knit project to make a gauge swatch can make all the difference between project success and total complete frustration.
A gauge swatch will tell you if you are knitting too tight or too loose for the pattern you are creating. It helps make sure that what you are knitting will measure out and fit just right. If you are new to knitting, you can also think of the gauge swatch as a test run for learning your stitches before you start your main project.
Cast-on with the recommended gauge swatch stitch count and knit the number of rows indicated to achieve gauge. Once finished, your swatch should measure out to 4” x 4”. If your swatch comes out too small, it means you are knitting too tightly, so loosen up your stitch tension a bit. If your swatch comes out larger than 4”x 4”, you are knitting too loosely, so tighten up your stitch. Once you have achieved gauge, unravel the yarn from your gauge swatch. You will use this yarn to knit your project.
PROJECT NOTES
Please take a moment to review some of the knitting techniques used to make your Low Tide Wrist Warmers. This project is knit flat and once complete you will seam your project together to create a round shape and opening for the thumbhole.
HOW TO MAKE A SLIPKNOT
HOW TO CAST-ON USING THE LONGTAIL CAST-ON METHOD
HOW TO KNIT THE KNIT STITCH
HOW TO KNIT THE PURL STITCH
HOW TO BIND-OFF
PATTERN ABBREVIATIONS
K: a Knit stitch
P: a Purl stitch
K2, P1: This is a rib stitch pattern where you will Knit 2 stitches and Purl 1 stitch. When you repeat this combination of 3 stitches over and over along your row, you create the front side of a 2x1 rib pattern.
K1, P2: This is a rib pattern where you will Knit 1 stitch and Purl 2 stitches. When you repeat this combination of 3 stitches over and over along your row, you create the back side of a 2x1 rib pattern.
PATTERN
WANDERLUST WRIST WARMERS
1. With a 39" long yarn tail, make a slip-knot. Your slip-knot is considered your first stitch.

2. Cast-on an additional 25, (28), 31 stitches using the LONG-TAIL CAST-ON METHOD. You should now have a total of 26, (29), 32 stitches

3. Row 1: *K2, P1 repeat from * to the last two stitches then K2
4. Row 2: *P2, K1 repeat from * to the last two stitches then P2
5. Round 3 & onwards: Repeat rows 1 & 2 until work measures 6", (8"), 9” from the cast on edge.
Once you have repeated those first two rows a couple of times, you will begin to see the 2x1 rib pattern take shape.
A COUPLE ROWS COMPLETE:

Front Side of 2x1 rib pattern

Back Side of 2x1 rib pattern
WORK COMPLETE

Front Side of 2x1 rib pattern

Back Side of 2x1 rib pattern
6. BIND-OFF in pattern, keeping a relaxed but not loose bind-off edge.
To BIND-OFF IN PATTERN, means you continue to Knit the Knit stitches and purl the purl stitches of the pattern as you bind-off your work.
7. Trim a yarn tail approximately 12” long.

SEAMING TOGETHER THE SIDE SEAMS.
Choose which Rib Pattern side you would like to have as the outside Rib Pattern of your wrist warmer. The side you choose to be the outside will now be referred to as the Right Side of your work, and the inside will be referred to as the Wrong Side of your work.
8. Placing the Right Side of the wrist warmer fabric facing down against your table (the Wrong Side facing up) take both side edges and fold them to meet together.

9. Weave your Cast-On yarn tail through your sewing needle and seam the side seam together up for a total of 3.5", (4.75"), 5.25" up from the Cast-On edge. (Do not trim yarn tail yet).

10. Next, take the Bind-Off yarn tail and weave it through your sewing needle and seam the side seams together down from the Bind-off edge a total of 1.25", (1.5"), 1.75". Leaving a thumbhole opening that is 1.25", (1.75"), 2" (Do not trim yarn tail yet).
11. Try the wrist warmer on. You can adjust the thumb hole opening by increasing or decreasing the length of these sewn seams.
12. Once you have finalized the fit, turn your wrist warmer inside out. Secure and trim your yarn tails by weaving in all loose ends through the stitches on the Wrong Side of your wrist warmers.
FINISHING
9. Weave in all loose ends, and proudly sew on your Project Weekend x's ME. label.


MAKE ANOTHER ONE!
SHOP THE YARNKNIT A NEW PROJECT!
SHOP KNITTING KITS